Using the `MiVRy Composite`:
`Composite` Nodes in a Behavior Tree are the switches which decide what the NPC is going to do next.
The `MiVRy Composite` (C++ class name `UBTComposite_MiVRy`) is a Composite Node that will select an action based on the last gesture that the player performed – if any.
For example, you can connect two NPC actions to a `MiVRy Composite`, the first one to “wait and idle”, and the second one to “walk towards the player”.
Then you can set the `MiVRy Component` to choose the first action (“wait and idle”) until the player performs a “come here” gesture, upon which it should select the second action (“walk towards player”).
This is done by associating recorded gestures with the child nodes (or sub-trees) connected to the `MiVRy Composite`.
To use the `MiVRy Composite`, open your BehaviorTree in the Unreal Editor and create a new `MiVRy Composite` node.
Connect the node to your existing behavior tree, so that it will be considered for deciding the next action of the NPC.
MiVRy Actor:
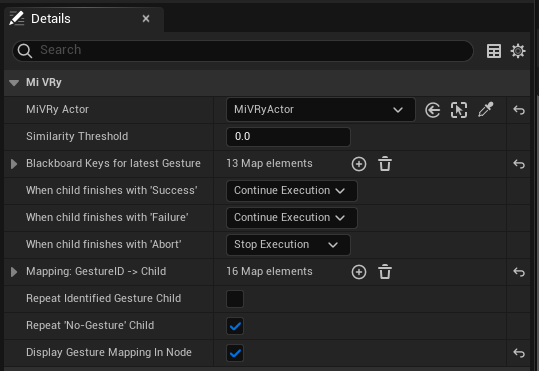
In the Details of the `MiVRy Composite` node, you must set a `MiVRy Actor` which tracks the user’s motions and identifies the user’s gestures. So if you don’t have a `MiVRy Actor` in your Level yet, please create one and set its Details according to your needs (most importantly, set the “Gesture Database File” and the “Trigger Input” for the left and/or right hand according to your input scheme).
Similarity Threshold:
The `MiVRy Composite` node also allows setting a “Similarity Threshold” for gesture identification.
The Similarity Threshold an identified gesture is “good enough” to accept as a command.
This can be necessary, because MiVRy will always identify the “most likely” gesture. So if the user is making a motion that is different from all of the gestures that you recorded, it will still tell you which of the recorded gestures is “most similar” to the user’s motion.
So you may want to set a threshold for accepting gesture commands, based on how well they actually match with the recorded gesture. A value of “1.0” would mean that the user’s motion is the perfect average of all the recorded gesture samples. A value of “0.0” would mean that the user’s motion is nothing like the recorded gesture samples.
Mapping: Gesture ID -> Child:
The decision which gesture leads to which NPC behavior is defined in the `Mapping: Gesture ID -> Child` setting.
“Child” here means the Behavior Tree nodes connected at the bottom of the `MiVRy Composite` node.
The left number is the Gesture ID, the right number is the index of the child node in the Behavior Tree that you want to have executed, starting a “0” for the left-most child node and counting upwards.
For example, a mapping of “1 -> 0” would mean that when gesture “1” is identified, the left-most child in the Behavior Tree is executed. A mapping of “23 -> 1” would mean that whenever gesture “23” is identified, the second child in in the Behavior Tree is executed.
A special case is the Gesture ID “-1” which stands for “no gesture was identified”. You can use this mapping to select the NPCs behavior for the times when the player is not doing any gestures.

NOTE: Every gesture ID can be mapped to only one child node. This can lead to problems when adding a new mapping with the (+) button because the new mapping would default to “Gesture ID = 0”. If you have already created a mapping for the Gesture ID “0”, then the Unreal Editor will reject creating new mappings. To avoid this, temporarily set the “Gesture ID” of “0” to something else, for example “999”, and return it to “0” when you’re finished adding new mappings.

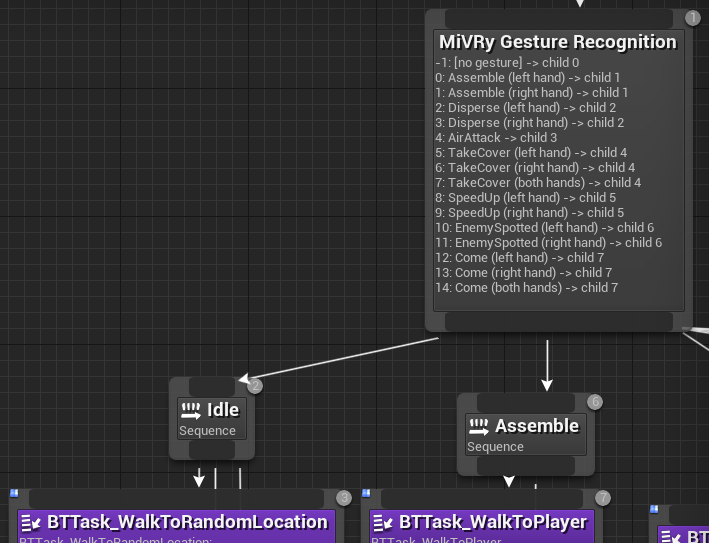
Display Gesture Mapping in Node:
To simplify setting up the mappings, you can activate the “Display Gesture Mapping in Node” setting.
Then you can see all the mappings in the Behavior Tree with the respective gesture name.
However, this can slow down the display of the Behavior Tree, so you may want to disable it after you finished your setup.
Repeat Identified Gesture Child:
You can also decided which NPC behavior to select after the NPC has completed the action associated with the gesture with the “Repeat Identified Gesture Child”.
For example, if you map a “come-here” gesture to the NPC behavior “walk-to-player” and activate the “Repeat Identified Gesture Child”, then the NPC will continue to follow the player around until a different gesture is performed. If you deactivate “Repeat Identified Gesture Child”, then the NPC will only walk to the player once and then return to its default behavior.
Repeat the ‘No-Gesture’ Child:
There is a separate option to “Repeat the ‘No-Gesture’ Child”. The ‘No-Gesture Child’ here means the child node mapped to the Gesture ID “-1” as described above.
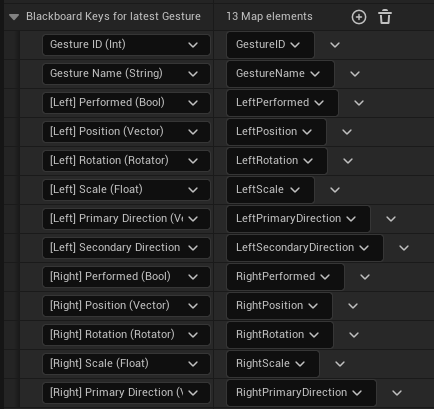
Blackboard Keys for latest Gesture:
If you want to control the NPC behavior not only by which gesture was performed but also by the way it was performed, you can do so via Blackboard variables.
For example, if your player performs a “look there” gesture, you may want the direction of the gesture motion to control in which direction the NPC looks.
In the “Blackboard Keys for latest Gesture” you can chose to save details about the performed gesture into Blackboard variables which can then be used by other Behavior Tree nodes to control the NPC.
For example, you can create a Blackboard variable of the type “Vector” and name it “Direction”, and then in the `MiVRy Composite` chose to save the “Primary gesture direction” (of either hand) into that variable.
Then, in other Behavior Tree nodes you can read that variable to control the NPC’s behavior.
When child finishes:
Finally, you can also chose what to do when the child node selected by a gesture finishes, based on whether the NPC successfully performed the action or not.
For example, when a “come-here” gesture causes the NPC to walk to the player, you can select “Continue Execution” so that the NPC will wait for the next gesture. But if the NPC failes to walk to the player and aborts its action – for example when it sees an enemy – you can select to “Stop Execution”. The `MiVRy Composite` node will than return to the next higher-level node so that the NPC behavior can be controlled by other nodes – for example those nodes defining how to engange the enemy.
Using the `MiVRy Decorator`:
Alternatively, you can attach a `MiVRy Decorator` to any node in your Behavior Tree to add Gesture Recognition to it.
A `Decorator` is a kind of “plug-in” to a node that filters whether the node should be evaluated at all.
The `MiVRy Decorator` will either allow or deny the evaluation of the node based on the gesture performed by the user.
For example, you can have a Behavior Tree node that controls an NPC to “walk around randomly” but may want that behavior to stop as soon as the player performs a “come-here” gesture.
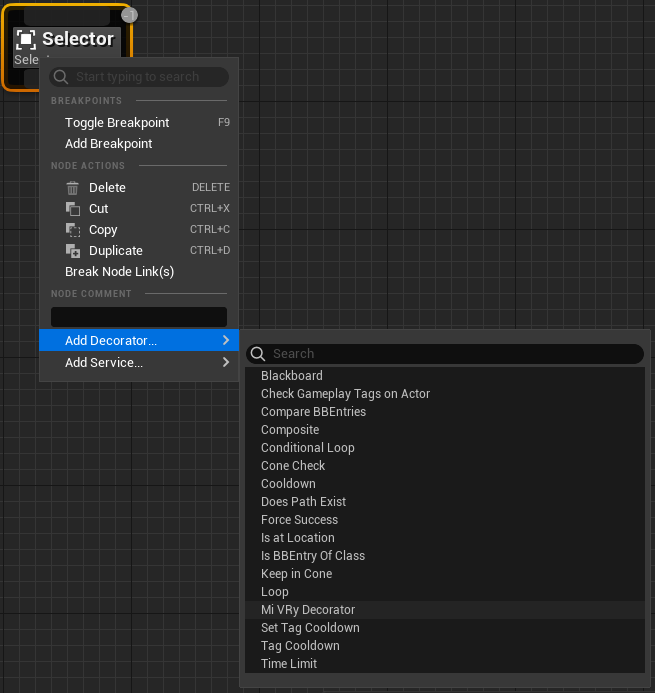
To use a `MiVRy Decorator`, right-click on your node in the Behavior Tree and select “Add Decorator… -> MiVRy Decorator”.
MiVRy Actor:
In the Details of the `MiVRy Decorator`, you must set a `MiVRy Actor` which tracks the user’s motions and identifies the user’s gestures. So if you don’t have a `MiVRy Actor` in your Level yet, please create one and set its Details according to your needs (most importantly, set the “Gesture Database File” and the “Trigger Input” for the left and/or right hand according to your input scheme).
Similarity Threshold:
The `MiVRy Decorator` also allows setting a “Similarity Threshold” for gesture identification.
The Similarity Threshold an identified gesture is “good enough” to accept as a command.
This can be necessary, because MiVRy will always identify the “most likely” gesture. So if the user is making a motion that is different from all of the gestures that you recorded, it will still tell you which of the recorded gestures is “most similar” to the user’s motion.
So you may want to set a threshold for accepting gesture commands, based on how well they actually match with the recorded gesture. A value of “1.0” would mean that the user’s motion is the perfect average of all the recorded gesture samples. A value of “0.0” would mean that the user’s motion is nothing like the recorded gesture samples.
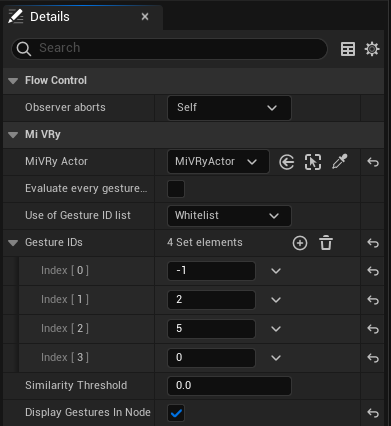
Use of Gesture ID list:
You can use the `MiVRy Decorator` deny or allow the execution of NPC behavior (Behavior Tree nodes) based on a list of Gesture IDs which you consider “acceptable” or “reason to cancel the behavior”.
This can be either a “Whitelist” (ie: the gestures in the list are the ones who permit the NPC to perform this behavior) or “Blacklist” (ie: the gestures in this list are the ones who do NOT permit the NPC to perform this behavior.
Gesture ID list:
To set which gestures the `MiVRy Decorator` considers the “right” or “wrong” gestures to affect NPC behavior, add them to the “Gesture ID list”.
The gesture ID “-1” stands for “no gesture was performed”.
NOTE: Every gesture ID can be in the list only once. This can lead to problems when adding a new item with the (+) button because the new item would default to “Gesture ID = 0”. If you have already created an item for the Gesture ID “0”, then the Unreal Editor will reject creating new items. To avoid this, temporarily set the “Gesture ID” of “0” to something else, for example “999”, and return it to “0” when you’re finished adding new items.
Display Gestures In Node:
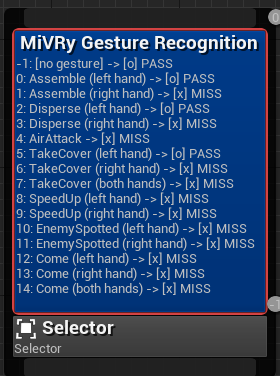
To simplify setting up the gesture list, you can activate the “Display Gestures In Node” setting.
Then you can see all the gestures in the Behavior Tree with the respective gesture name.
However, this can slow down the display of the Behavior Tree, so you may want to disable it after you finished your setup.
Evaluate every gesture only once:
This setting chooses what happens after the performed gesture was considered.
When activated, the `MiVRy Decorator` will return to acting as if no gesture was ever performed.
When deactivated, the `MiVRy Decorator` will continue to use the last performed gesture as a reference for whether to allow or deny the NPC behavior.
How to use the GestureRecognitionActor (for one-handed gestures):
(1) Add a GestureRecognitionActor to your level.
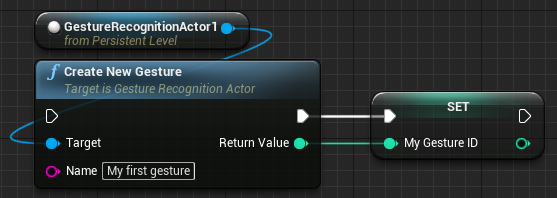
(2) Use the “Create New Gesture” function to create new gestures.
(3) Record a number of samples for each gesture by using the “startStroke” function with the, “contdStroke” and “endStroke” functions for your registered gestures, each time inputting the location and rotation of the headset or controller respectively.
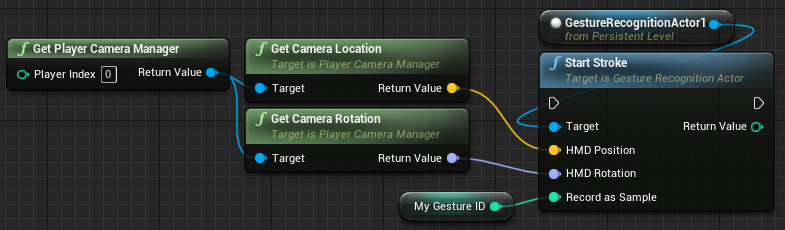
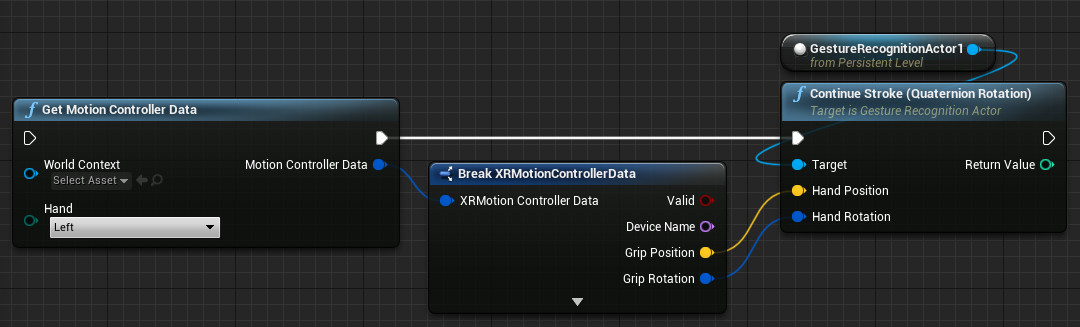
Repeat this multiple times for each gesture you want to identify.
We recommend recording at least 20 samples for each gesture.
(4) Start the training process by using the “startTraining” function.
You can optionally register delegates / callback events to receive updates on the learning progress.
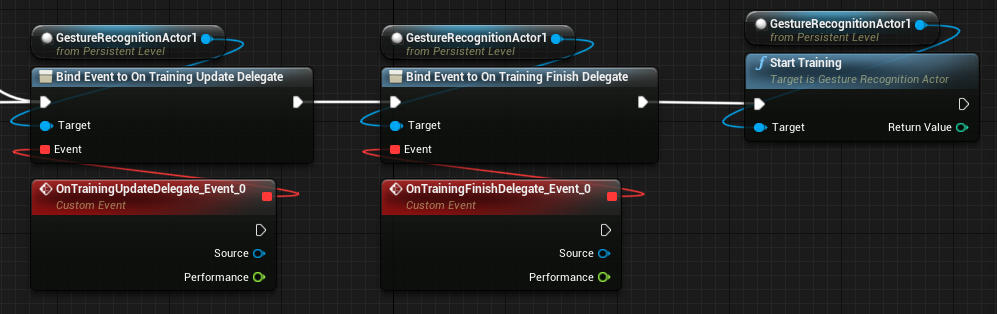
You can stop the training process with the “stopTraining” function.
After training, you can check the gesture identification performance with the “recognitionScore” function.
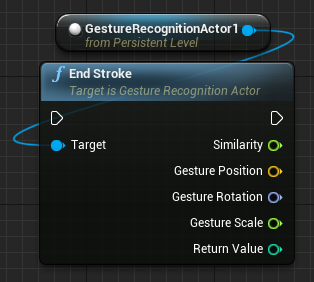
(5) Now you can identify new gestures performed by the user in the same way as you were recording samples. Just set the “Record as Sample” parameter of the “startStroke” function to “-1”. The “endStroke” function will provide the ID and name of the identified gesture, together with a similarity measure (0 to 1) of how closely the gesture performance resembled the recorded gesture samples.
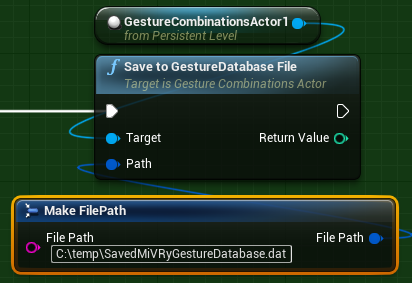
(6) You can save and load your gestures to a gesture database file with the “Save Gestures To Gesture Database File” function.
IMPORTANT: If you wish to use your gestures in a Unity app (for example with the Unity-based “GestureManager”, then make sure you enable the “Unity Compatibility Mode” in the Details Panel of the GestureRecognitionActor before you record any gesture samples!
How to use the GestureCombinationsActor (for two-handed gestures or gesture combos):
(1) Place GestureCombinationsActor in your level and set the desired “Number of Parts” in the Details Panel. For two-handed gestures, this is usually “2”, but if you intend to use combos of multiple sequential gesture motions for one or two hands, you can choose a different number.
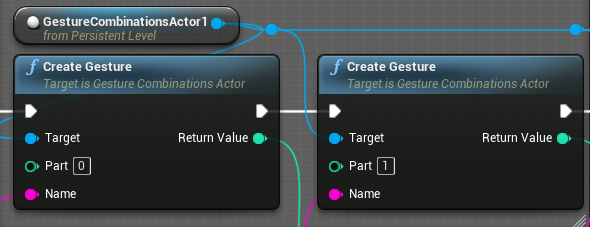
(2) Create a new Gesture Combination.
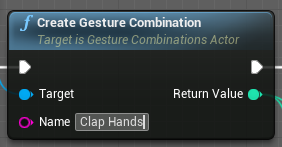
(3) Create new Gestures for each part, starting with part number “0”. (You can use “0” to mean “left hand” and gesture part “1” to mean right hand, or any other way to identify the different parts of the Gesture Combination.)
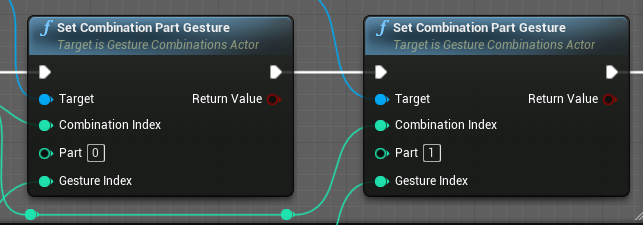
(4) Then set the Gesture Combination to be the combination of those gestures.
(5) Record a number of samples for each gesture using the startStroke, contdStroke and endStroke for your registered gestures. See Section 6 Point 3 of this document for details. The gestures for the various parts can be recorded in any order (first left hand then right or first right hand then left) or simultaneously. We recommend recording at least 20 samples for each gesture, and have different people perform each gesture in different ways.
(6) Start the training process with the startTraining function.
You can optionally register delegates / callback events to receive updates on the learning progress and the end of the training.
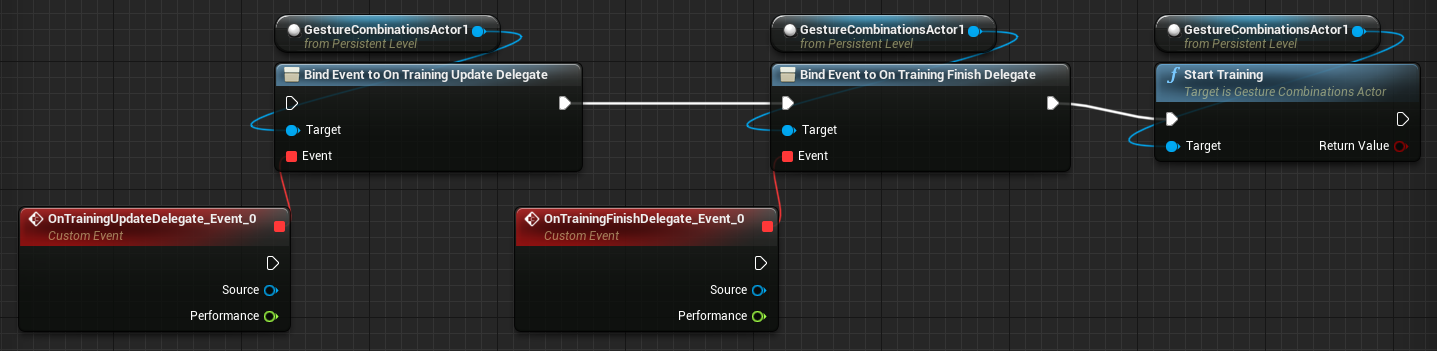
You can stop the training process by using the stopTraining function. After training, you can check the gesture identification performance with the recognitionScore function (a value of 1 means 100% correct recognition).
(5) Now you can identify new gestures performed by the user in the same way as you were recording samples by using the “startStroke”, “contdStoke”, and “endStroke” functions, just by setting the “Record as Sample” parameter to “-1”. Again, the order of performances (first left then right, first right then left, or simultaneously) does not matter.
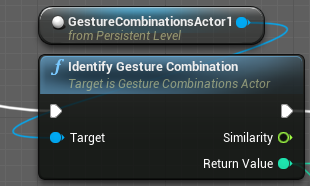
After all parts (for example left and right hand, or just one hand when only one hand was gesturing) have been completed, use the “Identify Gesture Combination” to find out which Gesture Combination was performed by the user.
(6) Now you can save and load the gestures (and the trained AI) by using the “Save to Gesture Database File” and “Load Gesture Database File” functions. The path can be either absolute or relative within your project.